Thursday, 30 November 2017

Facing ORA-01033 / ORA-01157 while trying to run RCU for OBIEE installation

The OBIEE 11g instance in my local has got corrupted and I was trying to reinstall it. In the process, I was required to recreate the DEV_BIPLATFORM and DEV_MDS schema (DEV4_BIPLATFORM and DEV4_MDS in my case).

Before running the RCU for creating new schemas, I had gone to the DB and have dropped the schemas. Point to be noted I have not dropped them using RCU rather I have manually dropped them using SQL Developer.

As there is a shortage of space in my local, I thought of deleting the DBF files also.


And I have done Shift + Delete these 2 files.

Now when I try to log in the RCU using my SYS account, I am facing error 'ORACLE initialization or shutdown in progress'.

I have tried to connect to the SYS account using SQL Developer and facing the same error 'ORA-01033: ORACLE initialization or shutdown in progress'.


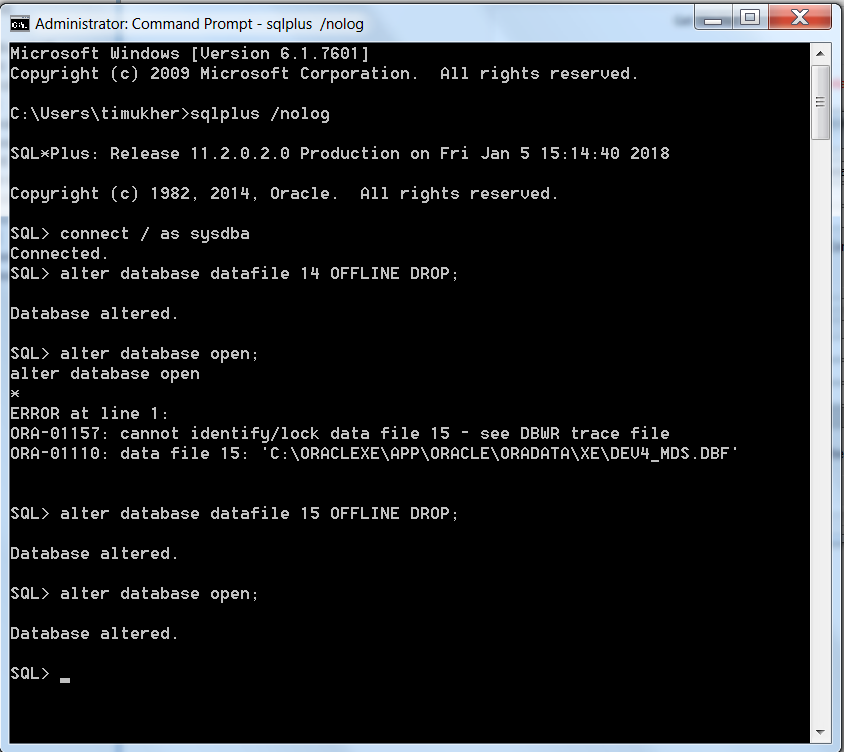
As I am unable to log in to the DB SYS account, I try to log in to SQLPLUS using the command prompt as '/'. And this time I am successful.

Now I try to alter the DB open (alter database open), and that revealed that Oracle can't identify/ lock data file 14 and 15.

A bit of googling revealed that it is due to deleting those 2 DBF files from the Oracle folder. The DB is unable to start completely as it is still looking for those 2 files.

Oracle docs note this on the ORA-01157 error:

ORA-01157: cannot identify/lock data file string - see DBWR trace file

Cause: The background process was either unable to find one of the data files or failed to lock it because the file was already in use.

The database will prohibit access to this file but other files will be unaffected. However, the first instance to open the database will need to access all online data files. Accompanying error from the operating system describes why the file could not be identified.

Action: Have operating system makefile available to the database. Then either open the database or do ALTER SYSTEM CHECK DATAFILES.


Obviously, I have made a mistake by deleting those 2 files manually, and now I am unable to use my DB. Now, what could be the resolution ?

There could be different ways out, including restoring the files. But I do not have the files and I want a quick and easy solution.

I run the command 'alter database datafile 14 OFFLINE DROP' (and for datafile 15 also).  And it alters the DB.

Next, I try to run 'alter database open' once again, and I this time I was successful. And these steps do the magic and resolves my problem with RCU, and puts me back on track for OBIEE installation.

Custom Style in OBIEE 11g / 12c

Let me take you through the steps for defining custom Skins and Styles in OBIEE. It is similar in 11g and 12c.

To start with, there is an sample ear file ORACLE_HOME/bi/bifoundation/jee/bicustom-template.ear


I copy and paste this ear file and rename it as bicustom.ear


I extract this ear file into a folder and then extract the war file inside the folder into another folder, let me name it bicustom_war.


Inside the bicustom_war/res folder there are 2 folders, and 1 xml file
1. s_Custom - folder for style
2. sk_Custom - folder for skin


3. filemap.xml - it contains the hierarchy for skins an styles


For the purpose of this demonstration, let me go into the  s_Custom/master. I am going to replace the existing custom.css and oracle_logo.png with new files for the customization purpose.


Once I am done with my changes, it is time to create the war file. And for that the prerequisite is to set the path for JDK.


Next step is to create the ear file. The command is same as of the war file.


Once the bicoustom.ear file is created I place it at the ORACLE_HOME/bi/bifoundation/jee folder. 


Now I need to deploy the ear file in the Weblogic Console. I go to Deployments


Click Lock & Edit, and click Install in the Deployments.


I navigate to ORACLE_HOME/bi/bifoundation/jee folder where I have kept the bicustome.ear file, and I select the ear file.


Next I select 'Install this deployment as an application'.


I select 'I will make the deployment accessible from the following location', and set the location as the ORACLE_HOME/bi/bifoundation/jee folder


I click Finish and the deployment is done.


Now I Activate the changes


Next I go to the Deployments again and select bicustom checkbox and start the new application.


If the deployment has happened successfully, then we can see a new option in Style drop down as 'Custom'.


I have created a sample report and put them into 2 dashboards. One with Style default 'Skyros'


And the other one with Style 'Custom'.


As we can see it has a different look and feel. There are different other styling options also in the folders which can be customized.

The details customizing steps can be further referred at Oracle Site.

Oracle BICS / OAC - using Data Sync to upload data in DBCS

I have subscribed for a free trial of Oracle BICS  (Oracle's Cloud BI) and exploring way to put my data into the Oracle DBCS (Oracle's Cloud DB).


Now there are multiple ways like Data Sync, RDC, RESTful API etc, however for this blog I am going to keep my focus to Data Sync only. Before going to Data Sync, let me check the information for businessintelldb (Oracle DBCS ).
I have downloaded and unzipped Oracle Data Sync in a local folder. There is no installation required. However there are certain prerequisites prescribed by Oracle.


To start Data Sync run datasync.bat (on Windows) or datasync.sh (on Linux/UNIX) from the directory where you installed Data Sync.

Once it starts, it will ask if you want to create a new project or use an existing one. In this case I am going to create a new one, and naming it 'BISample' as I am going to load the BISample schema from my local DB to the Cloud.


In Data Sync there are 3 tabs :

1. Connection - Create connection for Source and Targets
2. Project - Manage mappings, definition, parameters etc
3. Jobs - Create and schedule jobs

And our action items are also in the same order. So first we define and test Target, which is DBCS.


And Source, which is BISAMPLE schema in my local.


Next I go to Project tab. As our source is Relational Data, I click on that tab and choose for Discover objects.


I select BI Sample Source and Import all table with definition.


Once the table definition is in place it is time to create the mapping. In my case as I want to replicate everything in cloud, it is pretty straight forward.


Next it is time to define the Load Strategy.


Next I move to Jobs tab and create a job with the Source and Target. If required we can schedule multiple jobs, send email notification etc.

However in this case I just create, save and run the job.


Now I go to the Current Jobs to find the job in running status. We can also check the past jobs in the History tab.


Simultaneously, I log into the DBCS to find the recently created tables, which further confirms that the jobs is running and creating the tables in cloud.


Once the job is finished with 100% success, it is my time to validate the same in cloud.


I go the DBCS Object Browser to find the tables and data.


Which is matching with my local DB.


Pretty simple, obviously there is a huge scope to explore further complex scenarios.


Tuesday, 31 October 2017

Using R Sample (Base64Image) Plugin in Oracle DVD

This is in continuation of the earlier blog on Oracle Data Visualization with Advanced Analytics, let me go a step further and try to use a R Code in Oracle DVD.

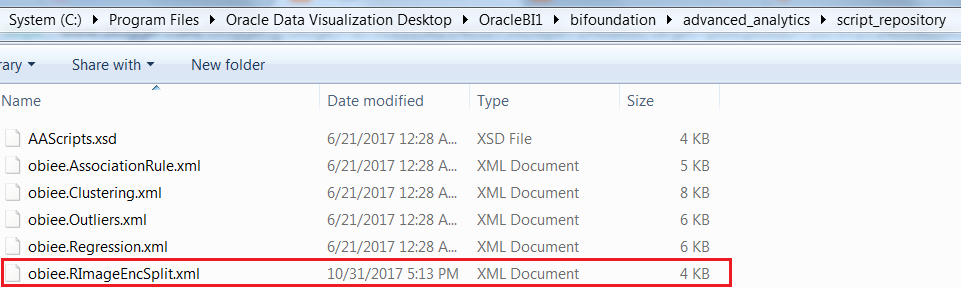
To begin with Oracle DVD is built with R and Java, and for the Analytics options like Clusters, Outliers etc we can find the corresponding codes in 'Oracle Data Visualization Desktop\OracleBI1\bifoundation\advanced_analytics\script_repository' folder.


For this demonstration, I am going to use Base64Image plugin that displays a base64 encoded image directly in Oracle DV.Image is assembled from chunks of encoded strings. It requires three inputs: image id, image parts sequence and image parts.

This plugin is available at Oracle Analytics Library along with lot of other plugins, may be we can try to explore them one by one later.


Once we have downloaded the plugin, we go to console and upload the custom plugin.


Once the plugin is successfully uploaded we can view it in the list of visualizations.


For the purpose of this demonstration, let us use Sample Order Lines data. Once we add the Base64ImgViz Plugin, we see it is asking for Image ID, Image Part ID and Image Part.


Now before we proceed any further we need add the custom R script in Script Repository. And for that I am going to use the xml below :

<script>
       <scriptname>obiee.RImageEncSplit</scriptname>  <version>12.2.1.0.0</version>
       <inputs>
              <column>
                     <name>Prod</name>
                     <nillable>NO</nillable>
                     <required>YES</required>
              </column>     
              <column>
                     <name>Sales</name>
                     <nillable>NO</nillable>
                     <required>YES</required>
              </column>
              <column>
                     <name>Profit</name>
                     <nillable>NO</nillable>
                     <required>YES</required>
              </column>
              <column>
                     <name>Q_Ordered</name>
                     <nillable>NO</nillable>
                     <required>YES</required>
              </column>
              <column>
                     <name>Shipping_Cost</name>
                     <nillable>NO</nillable>
                     <required>YES</required>
              </column>
       </inputs>
       <outputs>     
              <column>
                     <name>img_id</name>
                     <datatype>varchar(10)</datatype>
                     <aggr_rule>none</aggr_rule>
              </column>
              <column>
                     <name>img_part_id</name>
                     <datatype>varchar(10)</datatype>
                     <aggr_rule>none</aggr_rule>
              </column>            
        <column>
            <name>img_part</name>
            <datatype>varchar(2000)</datatype>
            <aggr_rule>none</aggr_rule>
        </column>
        <column>
            <name>Metric</name>
            <datatype>double</datatype>
            <aggr_rule>sum</aggr_rule>
        </column>
       </outputs>
       <options>
         <option>
              <name>dummmy</name>
              <value>100</value>
              </option>     
         </options>
       <scriptcontent>
  <![CDATA[
function(dat,dummy) {
 library(base64enc)
 #################### HeatMap Generation ######################
 for (i in 2:ncol(dat))
 dat[,c(i)] <- as.numeric(dat[,c(i)])
 hm_dat <- as.data.frame(aggregate(dat[,c(2:4)], 
            by=list(Product_Sub_Category=dat[,c(1)]), FUN=sum))
 df <- as.matrix(as.data.frame(lapply(hm_dat[,c(2:4)], as.numeric)))
 metrics_matrix <- as.matrix(df)
 row.names(metrics_matrix) <- hm_dat[,c(1)]
 fpath = tempfile()       
 # setup tempfile to capture the heatmap image
 png( fpath, width = 600, height = 600 )
 hv <- heatmap(metrics_matrix, col = cm.colors(512), scale="column",                        
          Rowv=NA, Colv=NA, margin=c(5,10),xlab = "",
          ylab= "Product Sub Categories",main = "Metrics heatmap")
 dev.off()
 # Convert the image into a base64 encoded string
 p <- base64encode(fpath)                                                               
 # Break the image into substrings and number them
 s <- substring(p, seq(1, nchar(p)-1, 2000), seq(2000, nchar(p)+2000, 2000))            
 # Capture all the fragments into a data frame
 o <- data.frame(img_id=1,img_part_id = substring(1000+1:length(s),2,10), img_part = s) 
 o$Metric <- 1
 return(o);                                                                              
 }
]]>
       </scriptcontent>
</script>

This script is divided into :
  1. Input Columns
  2. Output Columns
  3. R Script
    • Taking the data
    • Set up the temporary file to capture the image
    • Generate the image for heatmap
    • Convert the image into base64 encoded string  

In the script we are using library(base64enc), and to use that we need to install base64enc package.


Alternatively we can directly download the package from Cran Site, and unzip it and place it in the R Library.


And we can test it also.

We can ignore the warning message, it is appearing because my R is 3.1.1 and it will not cause any problem.

Now let us go back to DVD and build 3 calculated columns to be used in Base64ImgViz Plugin

  1. Img_Id : EVALUATE_SCRIPT('filerepo://obiee.RImageEncSplit.xml','img_id', 'Prod=%1;Sales=%2;Profit=%3;Q_Ordered=%4;shipping_Cost=%5', XSA('weblogic'.'Sample Order Lines')."Columns"."Product Sub Category",XSA('weblogic'.'Sample Order Lines')."Columns"."Sales",XSA('weblogic'.'Sample Order Lines')."Columns"."Profit",XSA('weblogic'.'Sample Order Lines')."Columns"."Quantity Ordered",XSA('weblogic'.'Sample Order Lines')."Columns"."Shipping Cost")
  2. Img_Part_Id : EVALUATE_SCRIPT('filerepo://obiee.RImageEncSplit.xml','img_part_id', 'Prod=%1;Sales=%2;Profit=%3;Q_Ordered=%4;shipping_Cost=%5', XSA('weblogic'.'Sample Order Lines')."Columns"."Product Sub Category",XSA('weblogic'.'Sample Order Lines')."Columns"."Sales",XSA('weblogic'.'Sample Order Lines')."Columns"."Profit",XSA('weblogic'.'Sample Order Lines')."Columns"."Quantity Ordered",XSA('weblogic'.'Sample Order Lines')."Columns"."Shipping Cost")
  3. Img_Part : EVALUATE_SCRIPT('filerepo://obiee.RImageEncSplit.xml','img_part', 'Prod=%1;Sales=%2;Profit=%3;Q_Ordered=%4;shipping_Cost=%5', XSA('weblogic'.'Sample Order Lines')."Columns"."Product Sub Category",XSA('weblogic'.'Sample Order Lines')."Columns"."Sales",XSA('weblogic'.'Sample Order Lines')."Columns"."Profit",XSA('weblogic'.'Sample Order Lines')."Columns"."Quantity Ordered",XSA('weblogic'.'Sample Order Lines')."Columns"."Shipping Cost")
What we are doing is passing the input columns and getting the output columns as stated in the xml.

Once the calculated columns are done we can add them in the Base64ImgViz Plugin visualization and the result is like,


We can add filters also to further slice / dice the data.


And that's it. May be next we can try to explore some more R scripts or DVD plugins.

Implementing & Testing Row Level Security in Power BI

I have suffered a great deal of pain while implementing and more so while validating Row Level Security in Power BI. Let me try to capture a...